
Technical Documentation
Technical Documentation
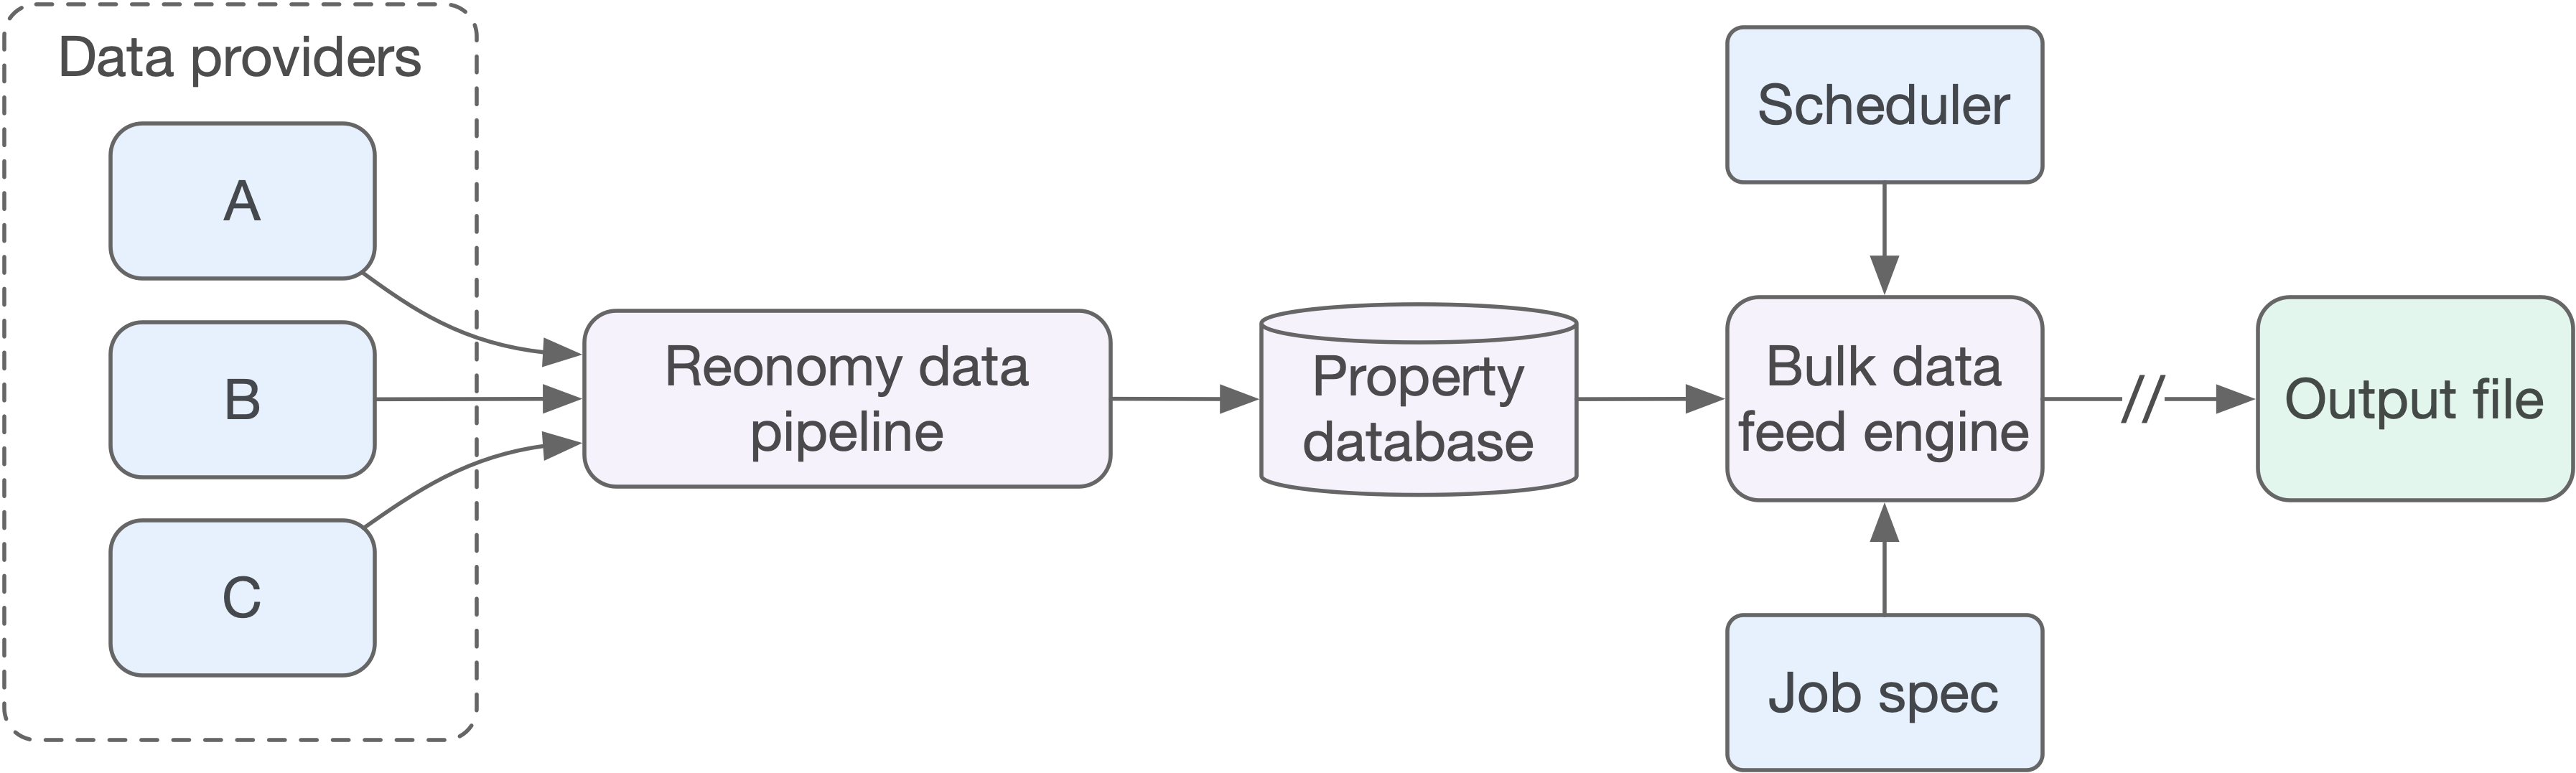
Bulk data feeds extend the capabilities of the existing search and batch APIs to provide programmatic access to bulk property data. The animation on the right illustrates how bulk data feeds work:
Bulk data feed jobs run asynchronously, meaning jobs are queued and run based on availability of backend resources. Jobs may take up to 12 hours to complete, but you can generally expect results in 1-2 hours. You can schedule jobs to run automatically, for example, weekly or monthly, as new data becomes available. Additionally, you can choose to run jobs as delta jobs, where the results include only data that has changed since the last time the job ran.
To generate a CSV file with mortgage data for multifamily properties in the Miami MSA:
properties node, then click Search > OK.search node. Then follow the instructions in the Search popup.data node, then click Single file property data > OK. Notice that the single_file output type defaults to csv.fields node. Then follow the instructions in the Select Fields popup.Important: Although you could run this job spec, we advise against it, since you'll use property credits associated with your account.
If you create a job spec that you want to schedule, or that you may want to run again in the future, you'll need to save it. Otherwise, if the job spec represents a one-off data request, you can run it without saving it. This "fire-and-forget" (temporary job spec) mode is also helpful if you're generating job specs programmatically and running them from a script.
Job Spec Editor — untitled
The Job Spec Editor on the right shows a sample job spec. It includes the search, match, single_file, multi_file, and options sections outlined below. If you click the New button, you can use the interactive tools to build your own job spec. When the spec is complete, click Validate to check the schema. If any section is missing or contains invalid information, hover over the ⓧ icon to view the validation error message, or check the status bar at the bottom.
Note: If you try to validate the sample job spec, you'll see validation errors. This is because certain options are incompatible (for example, you can't specify both single_file and multi_file in the same job spec). The goal here is to show the available options.
If you want to use the API directly to create a bulk data feed, use POST https://api.reonomy.com/v2/bulk-data-feeds and include the job spec into the request body.
propertiesThis is where you define the properties of interest, using either a set of search criteria (search), or by referencing a CSV file with property addresses, geolocations, or property IDs (match).
searchThe properties.search section may include one or more property searches. Each search is structured using the same JSON schema as the POST /search/summaries endpoint. The Job Spec Editor includes tools for building searches interactively and importing existing web app searches. Click 💡 beside the search node to access the tools.
matchThe properties.match section may reference one or more CSV files with property addresses, locations (as lat/lon coordinates), or property IDs. The property resolution component attempts to match addresses and locations to a Reonomy property ID when the job runs.
If specifying addresses, each CSV file must have at least the following columns:
If specifying locations, each CSV file must have at least the following columns:
The Job Spec Editor provides an easy way to upload files and identify the required columns (click 💡 beside the files node).
In addition to the required columns, you can also specify a row_id column. If specified, the values in this column are included in the output file, providing a way to "join" the output file to your original data. If you don't specify a row_id column in the job spec, the output file's row_id column includes a unique identifer for each row (<file_id>-<row_number>), for example:
| row_id | property_id | active | address_line1 | asset_category |
|---|---|---|---|---|
| 1ada7f58-3725-4bbe-aeff-096f94f65207-0 | 19cd94b6-0b51-543d-bfc1-3ed3205d13ae | TRUE | 767 3RD AVE | Office |
| 1ada7f58-3725-4bbe-aeff-096f94f65207-1 | 66258e65-0022-5af5-831e-22443f6dd854 | TRUE | 338 5TH AVE | Office |
dataThis is where you define the data you want and the output format.
View demo to learn about output options
The sections below describe how to configure the data section manually; however, predefined templates are available if you want CSV output delivered as a standard Reonomy report:
basic CSV file with one row of basic property information per property, plus one CSV file for each detail type, where each file has one record for each associated sale record, mortgage record, etc. Each row includes the matching property ID so you can join the resulting data as needed.single_filedata.single_file lets you specify which detail types to include in a single one-record-per-property output file:
basicmortgagesownershipreported_ownersalestaxestenantsFor information about the data that's included with each detail type, see the Data dictionary. For information about the structure of the single_file output, see Output data formats below.
The output section lets you specify the output file type:
ndjson: Each property is represented as a separate JSON object within a single file, with a new line character ('\n') between each object.csv: Each property is represented as a separate row in a comma-separated value file.For csv, you must include a fields section specifying which fields to include, and how to arrange and name the columns (see the example on the right). Click 💡 beside the fields node to use the Job Spec Editor's field selection tool. When specifying output fields in the editor:
basic, mortgages, etc.), select the fields you want to include in the output file. 2. If you want to change the default field name, hold down the shift key and click the field. tenants: 100 and contacts: 10 and then selecting five fields will generate 5,000 columns (100 x 10 x 5) in the output file (columns are included even if all values are blank). The total number of columns is displayed at the top right of the CSV Mappings tab.Important! When configuring CSV mappings for a single_file job, be sure to include the property detail types that match the field categories you selected. For example, to obtain occupant data, you must specify tenants in the detail_types section of the job spec, or you won't get any occupant data in the output file.
multi_filedata.multi_file lets you specify which record types (mortgages, taxes, etc.) to deliver as individual record-specific output files. Each mortgage document, tax record, etc. is returned as a separate record within the corresponding file. For more information about the structure of the multi_file output, see Output data formats below.
For each selected record type, the output section lets you specify the output file type:
ndjson: Each record is represented as a separate JSON object within the output file, with a new line character ('\n') between each object.csv: Each record is represented as a separate row in a comma-separated value file.For csv, you must include a fields section as described above. When configuring CSV mappings for multi_file jobs, be sure to include only mappings that are relevant for the specified record type.
Note: Foreclosure information is only available with multi-file output. To obtain foreclosure information, specify foreclosure as one of your detail types. Additionally, if foreclosure is the only detail type selected, you can't use the deltas option as there is no update time on foreclosure data. You can specify the deltas option if you have other detail types selected as well, but you'll receive foreclosure data for all properties that have foreclosure data on each run.
optionsEverything in this section is optional, however, bulk data feed jobs are designed to run on a scheduled basis to deliver the most recent updates from our data pipeline, so configuring the schedule section is recommended.
filter_piiWhen true, all fields tagged as PII (personally identifiable information) are excluded from the results. To see which fields are considered PII for each property detail type, see the Data dictionary. The default is false.
deltasWhen true, runs of this job return only property records that have changed since the last successful run (could be a scheduled run or a manual run). The default is false.
For "delta" runs, we always include the property's active field in the output (in the basic file for multi-file output). By examining this field you can tell if a previously matched property has been inactivated (deprecated) since the last run ("active": false), in which case you may want to delete it from the target data store. You can check the deprecation_date field to see when it was deprecated (this field is not included in CSV output by default).
external_storageIf you want the output file delivered to an S3 bucket or Azure Storage container, specify the required connection information here. See AWS S3 bucket configuration or Microsoft Azure Storage configuration for details. If you don't configure external delivery, you'll be able to download the output file using GET /bulk-data-feeds/runs/{id} or access it via SFTP.
notificationsThis section lets you configure email addresses to receive job status notifications.
scheduleThis section lets you configure your job to run on a fixed schedule (for example, once a week or once a month). The schedule section has the following fields:
cron: A cron string specifying the run schedule for this job in minute hour day_of_month month day_of_week format (see https://crontab.guru for examples). You can't schedule a job to run more often than hourly. For additional information about the exact cron format required for specifying job schedules, see the crontab documentation. Times are in the UTC (Coordinated Universal Time) zone. Note that jobs may not start at the exact time specified in the cron string, but will start within one hour of that time.enabled: true to schedule this job to run according to the specified schedule.start: The date to start scheduled execution.end: The date to end scheduled execution.By default, each scheduled run returns all matching property records. To configure scheduled runs to return only property records that have changed since the last run (could be a scheduled or a manual run), set deltas to true.
When specifying the external_storage, notifications, and schedule options in the Job Spec Editor, make the initial selections via the 💡 icon, then provide the details by editing the job spec directly.
zip_outputWhen true, output files are zipped into a single file for delivery. The default is false.
Job Spec Editor — untitled
View demo to learn about output options
single_file jobs return one record for each matching property. This means that for detail types like taxes, each property record may contain multiple tax records—one for each year where tax data is available—as shown in the NDJSON example on the right.
When using CSV as the output type, each property is returned as a single row in the CSV file. The CSV mappings you include when requesting CSV output (see CSV mappings above) specify how many of the tax records you want (for example, 2) and which fields to include.
| taxes_0.year | taxes_0.amount | taxes_1.year | taxes_1.amount |
|---|---|---|---|
| 2019 | 16087 | 2018 | 16087 |
When multiple records (like taxes) are included in the same row, or if multiple instances of child objects (like addresses) exist within the same row, the CSV columns are collated by default ("collate": true). Collation groups records or nested fields together, as shown in the example above, where all data for taxes_0 is followed by all data for taxes_1. Setting "collate": false would arrange those same columns like this:
| taxes_0.year | taxes_1.year | taxes_0.amount | taxes_1.amount |
|---|---|---|---|
| 2019 | 2018 | 16087 | 16087 |
Additionally, for CSV output only, if your database imposes field length restrictions, you can specify the maximum length for strings (minimum value 40). Setting the string_length option causes all string values to be truncated to the specified number of characters.
multi_file jobs return one record per record type, where the record type represents the primary entity (or data object) associated with the selected constituent record type, as shown in the table below. If you choose, for example, taxes as the detail type, then each record in the results file is a tax record and the property ID is included with each record.
| Record type | Primary entity |
|---|---|
foreclosure | Foreclosure document |
mortgages | Mortgage document |
ownership | Contact (person or company) |
reported-owners | Reported owner |
sales | Sale document |
taxes | Tax record |
tenants | Tenant business |
The NDJSON example on the right shows a constituent record view of tax records, with a property_id field included in each record.
With CSV output, there may be multiple rows for each property, with the property ID included in each row.
| property_id | taxes.year | taxes.amount |
|---|---|---|
| 00985562-6b71-533c... | 2019 | 16087 |
| 00985562-6b71-533c... | 2018 | 16087 |
Note: Some record types may themselves include other record types (for example, a tenant can have multiple contacts). When this happens, the API "flattens" the response according to the CSV mappings, as it does for regular CSV output. It does not (for example) create a separate row for each contact within each tenant. The collate option (see single_file above) determines how columns are grouped for flattened objects.
Click the Job Spec Editor's Open button to view the data feeds associated with your account.
GET https://api.reonomy.com/v2/bulk-data-feedsJobs you create using POST /bulk-data-feeds are linked to your API account. GET /bulk-data-feeds returns a list of all jobs associated with your account.
The response includes the details for each of the bulk data feed jobs associated with your API account. For each job, you'll find the job ID you need to specify to start a run. To get the job spec for a specific job, use GET https://api.reonomy.com/v2/bulk-data-feeds-id.
If you need to edit a job spec, use PUT /bulk-data-feeds/{item_id} or the Job Spec Editor above.
You can start jobs from the Job Spec Editor by clicking the overflow (...) menu at the top right of the editor and choosing Run. Your job will be queued and will complete within 12 hours. All jobs started from the Job Spec Editor will run as "full" runs. To start a job as a "delta" run, you must use the API (see below).
When checking the job status or accessing the results, there are important differences depending on whether the job spec you run is saved or temporary (unsaved). These differences are noted in the sections below.
Running a job will consume API credits for properties you haven't already accessed. There's no way to cancel a job once it's been queued to run. For CSV output, you can get a preview of the job's output without consuming API credits by using the Job Spec Editor's Preview command.
POST https://api.reonomy.com/v2/bulk-data-feeds/runsThe example on the right shows a POST request to start a bulk data feed job. Specify the ID of the job you want to run in the request body's data_feed field.
When you start a job, it runs as a "full" run or a "delta" run, according to the "deltas" setting in the job spec's "options". For jobs with "deltas": true:
prev_run) in the request body, the job runs as a "delta" job and returns records that have changed since the specified run.GET /bulk-data-feeds/runs, specifying the job ID as the data_feed query parameter, for example:https://api.reonomy.com/v2/bulk-data-feeds/runs?data_feed=9a48c07a-db9a-4001-bdbc-137011821970
When you start a run, the API returns information about the run, including the run ID (the id field in the response). You can use the run ID with GET https://api.reonomy.com/v2/bulk-data-feeds/runs/{id}; to get the run status and the URL for the output file when the job completes. You can also use GET https://api.reonomy.com/v2/bulk-data-feeds/runs as described below, although this endpoint doesn't include the detailed intermim status information.
You can check the run status from the Job Spec Editor by clicking the Run History button at the top of the editor.
Saved feeds versus temporary feeds
If a saved job is open in the Job Spec Editor, you'll see the status of runs for that job spec on one tab, and runs for temporary (unsaved) feeds on another tab. If you're not viewing a saved job spec, you'll see just the status of temporary feeds.
GET https://api.reonomy.com/v2/bulk-data-feeds/runsGET /bulk-data-feeds/runs returns the status of all runs associated with your API account, but if you specify the bulk data feed job ID as the data_feed query parameter, you'll get run information for just that job.
By default, this endpoint returns runs sorted with the newest run first.
By running this query periodically, you can check the status field in the response to know when your run is complete. You can also use GET https://api.reonomy.com/v2/bulk-data-feeds/runs/{id}; to get just the status of a specific run.
You can download the output files from the Job Spec Editor by clicking the Run History button at the top of the editor. For any job that completed successfully, click the download icon to download the results.
Saved feeds versus temporary feeds
If a saved job is open in the Job Spec Editor, you'll see the status of runs for that job spec on one tab, and runs for temporary (unsaved) feeds on another tab. If you're not viewing a saved job spec, you'll see just the status of temporary feeds.
If you have the run ID, you can use GET https://api.reonomy.com/v2/bulk-data-feeds/runs/{id}; to get the URL of the output file from that run.
Alternatively, use GET https://api.reonomy.com/v2/bulk-data-feeds/runs to get information that includes the output file URL for all runs, or all runs associated with a specific bulk data feed job if you use the data_feed query parameter.
The GET https://api.reonomy.com/v2/bulk-data-feeds/runs/{id}; response is shown here. The result_url field has the URL you can use to download the output file (NDJSON or CSV, depending on the output setting in the job spec).
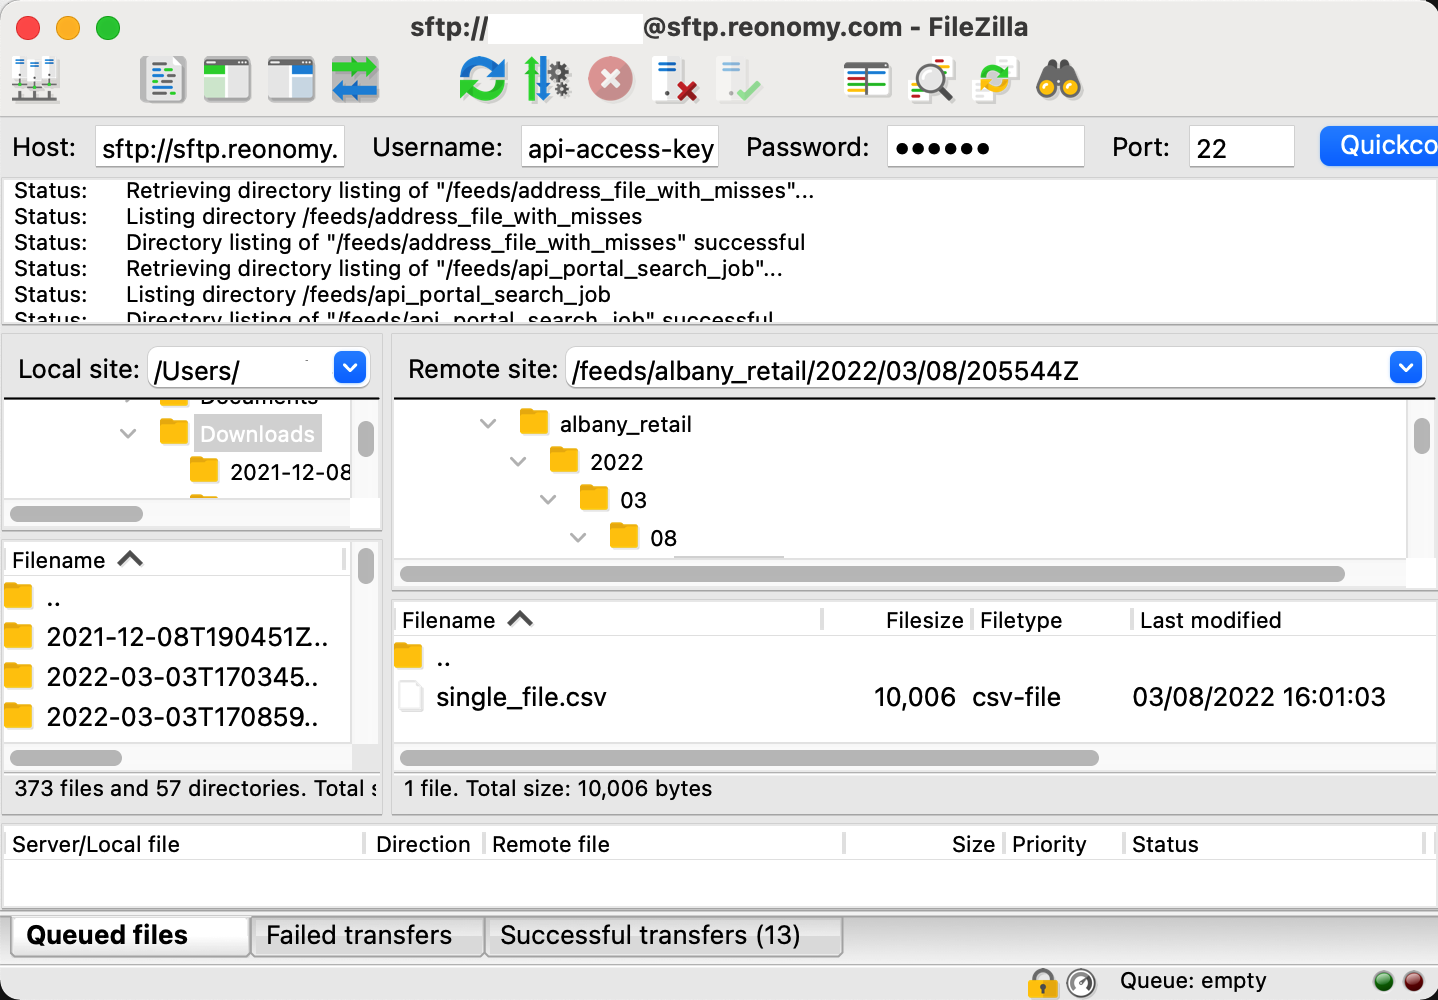
Bulk data feed output files are delived to a location you can access via SFTP using your API access key and secret.
You can use any SFTP client to access the files:
sftp://sftp.reonomy.com on port 22 using your API access key as the username and your secret key as the password.feeds folder. You'll see your bulk data feeds listed by name.Saved feeds versus temporary feeds
The results for saved feed are stored under the feed name. Results for temporary (unsaved) feeds are stored within a folder called temporary_feeds.
Bulk data feeds can optionally deliver output files directly to an AWS S3 bucket. To do this:
external_storage section using S3 bucket name, path, and IAM credentials.Each step is explained in detail in the sections below.
To configure the service account used to deliver the output files:
In the AWS Console, go to the Identity and Access Management (IAM) home page.
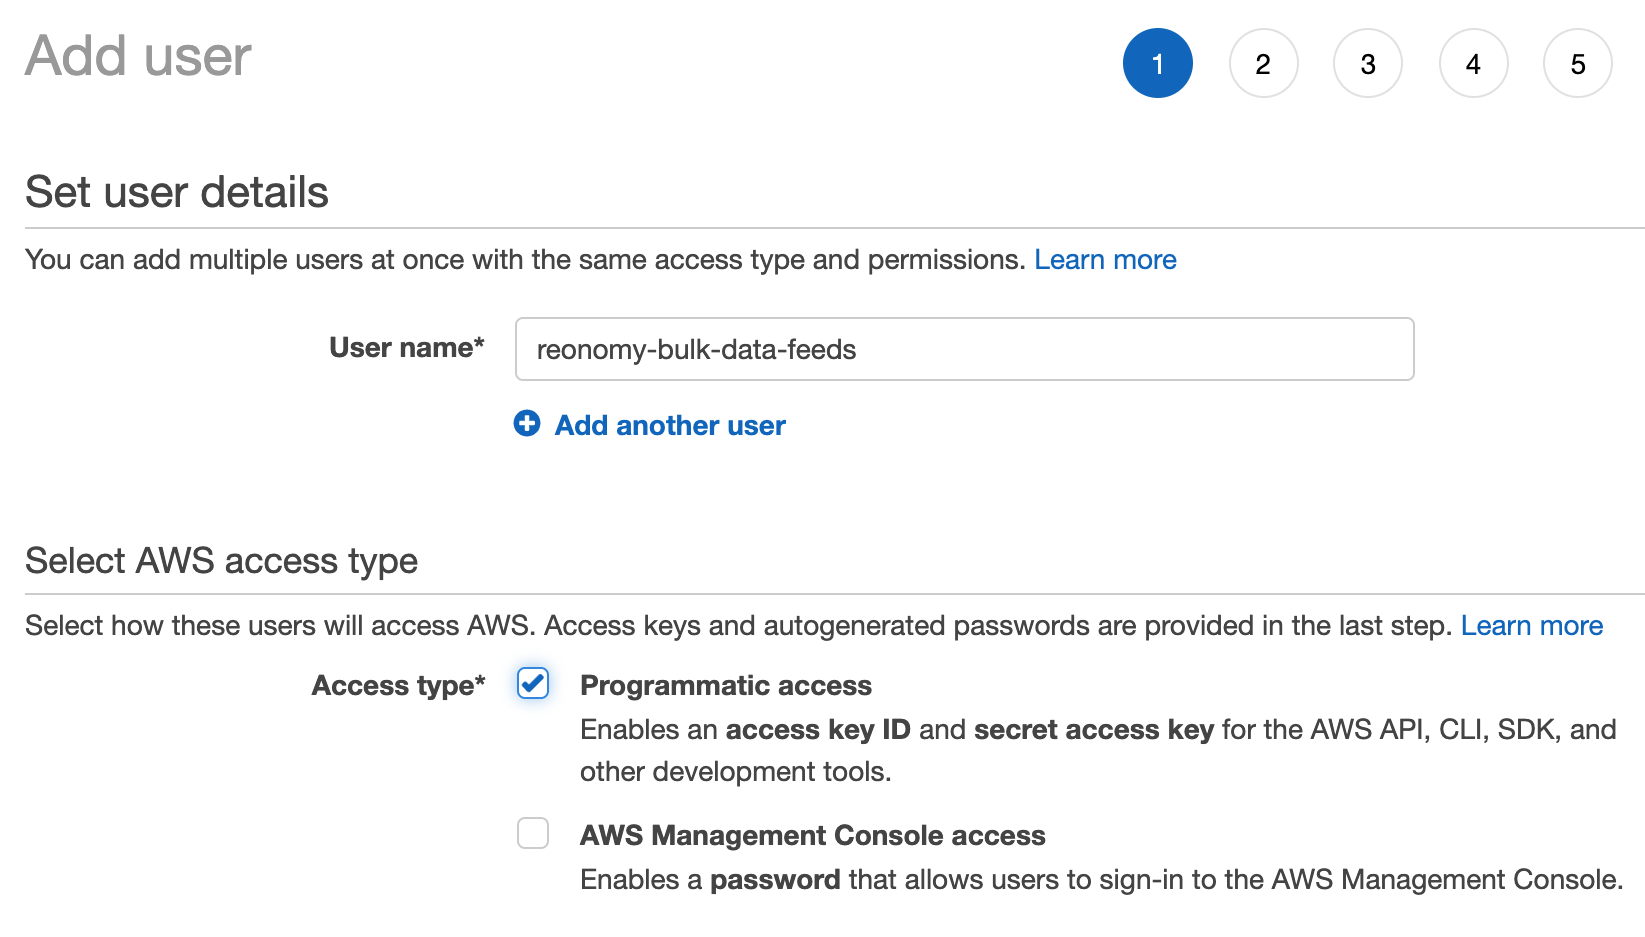
Open the Users page and click Add user.
Enter a user name and select Programmatic access.
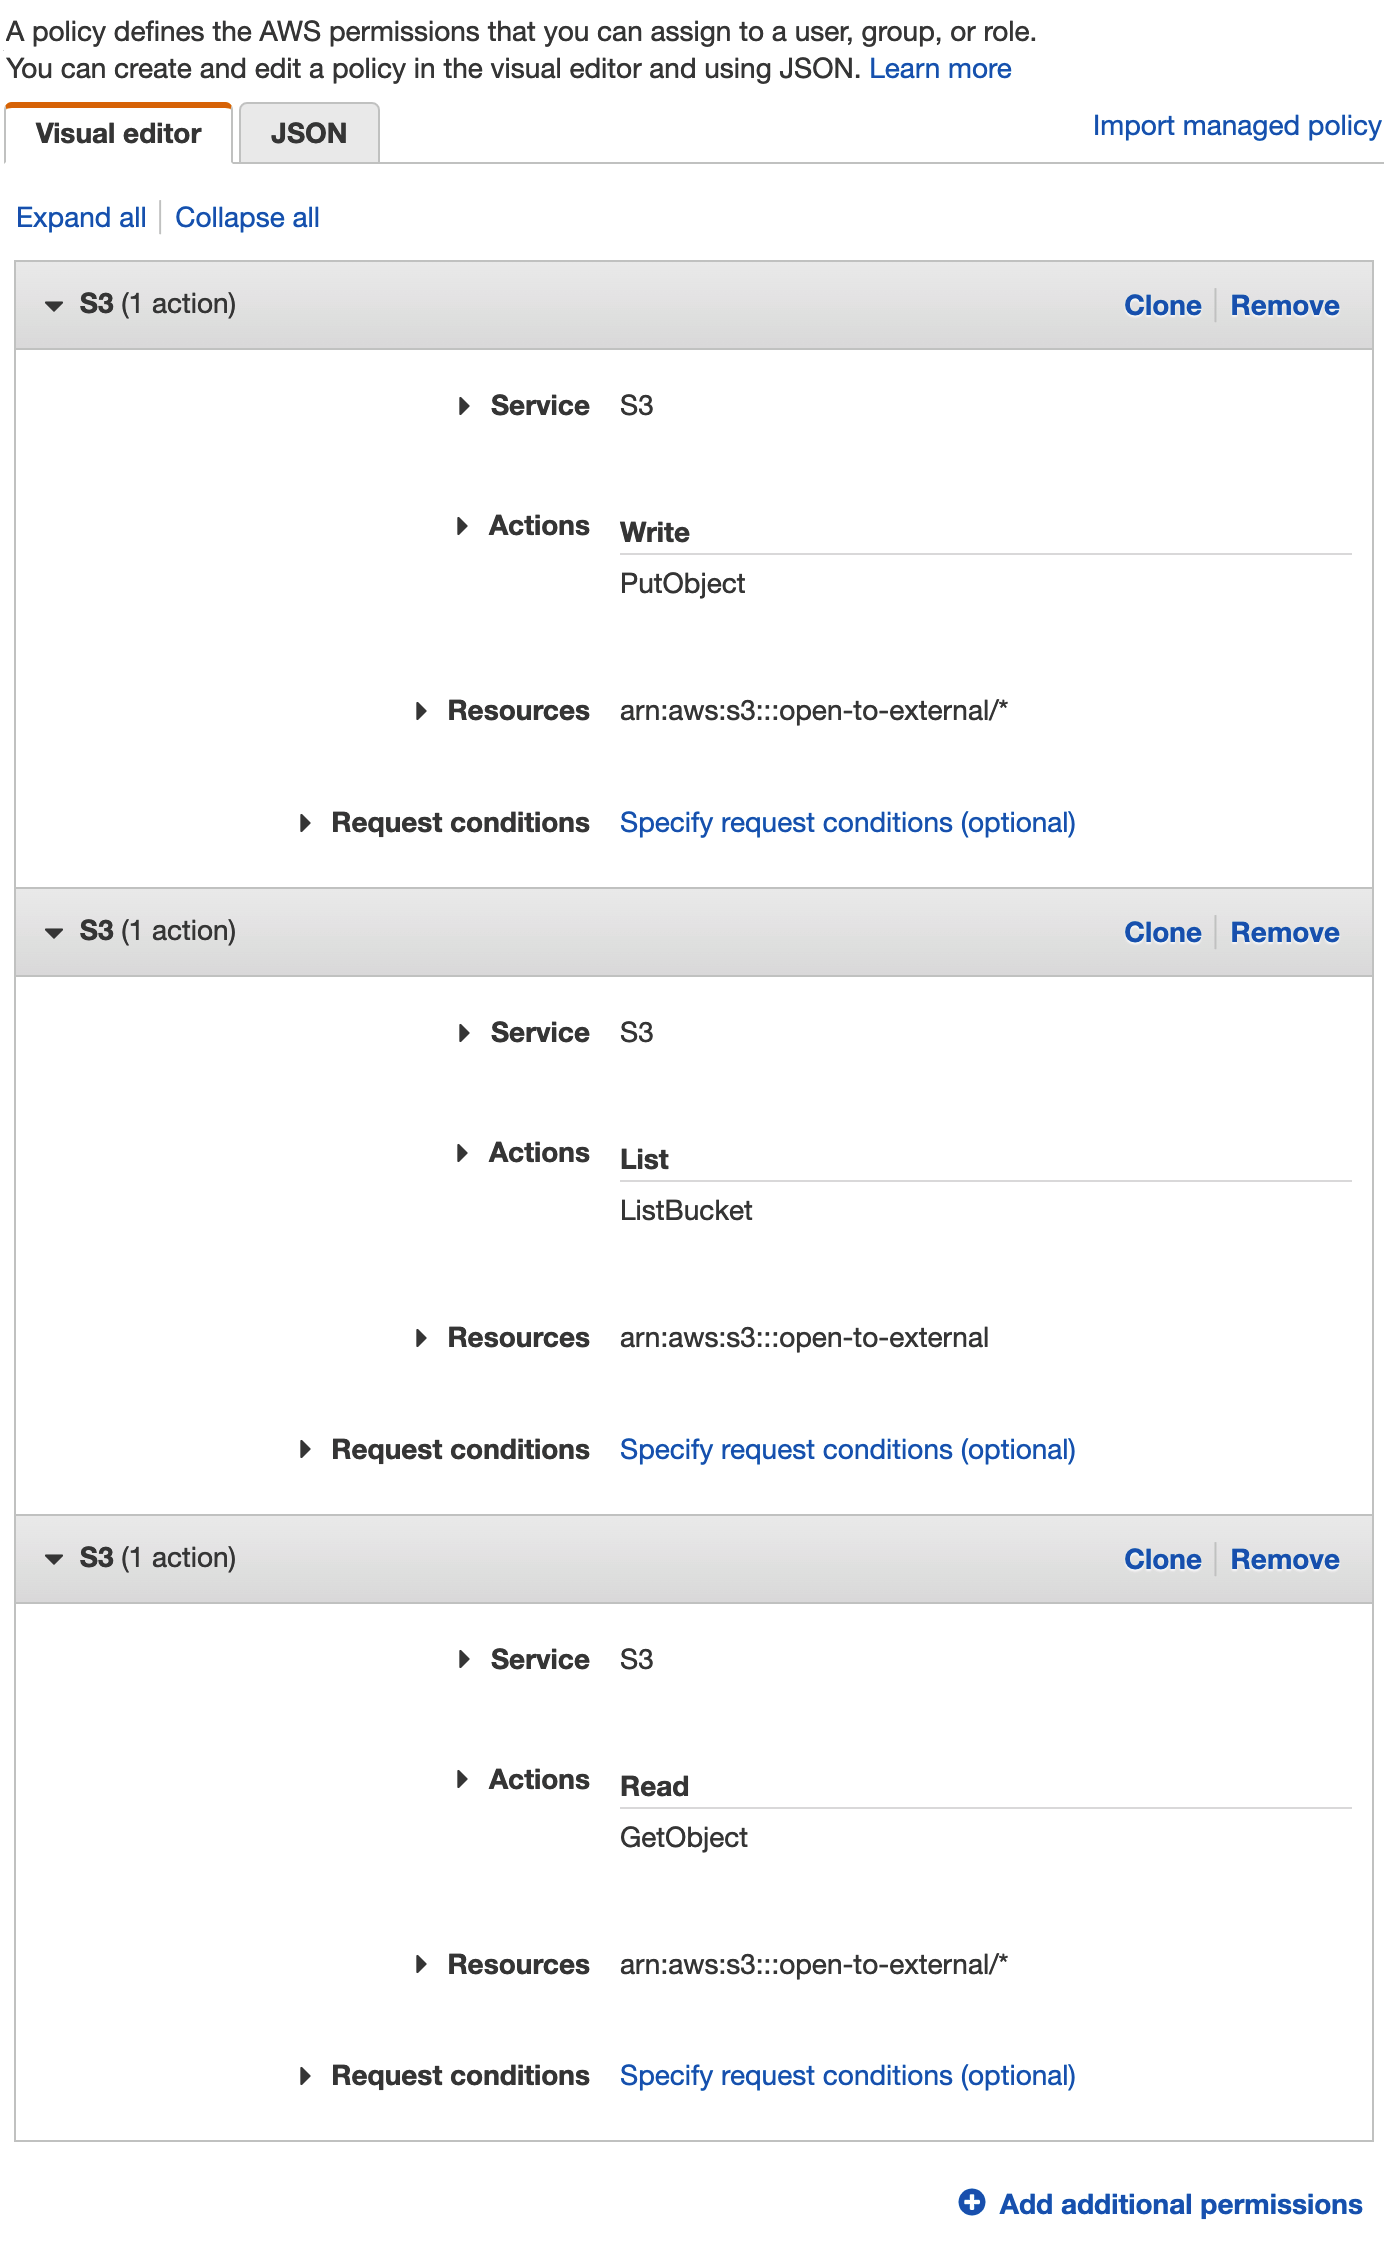
On the Set permissions page, select Attach existing policies directly and then click Create policy.
Configure the new policy as follows, replacing <bucket-name> with the name of the bucket you want to use:
| S3 | |
|---|---|
| Service: | S3 |
| Actions: | Write |
| PutObject | |
| Resources: | arn:aws:s3:::<bucket-name>/* |
| Service: | S3 |
| Actions: | List |
| ListBucket | |
| Resources: | arn:aws:s3:::<bucket-name> |
| Service: | S3 |
| Actions: | Read |
| GetObject | |
| Resources: | arn:aws:s3:::<bucket-name>/* |
Click Review policy, then give the policy a name and click Create policy.
Skip the Add tags step and click Create user.
On the Success screen, save the Access key ID and Secret access key required in the next section.
Using the bucket name and IAM credentials from above, configure the external_storage section of the job spec's options section as shown on the right. The path is optional.
Note: When you open (or GET) a job spec that's configured for external storage on AWS, the credentials fields are not included in the version that's returned by the server. This is done to maintain the security of your credentials. If you need to modify an existing job spec, you'll need to include your credentials in the new version before saving it.
{
  "options": {
    "external_storage": {
      "s3": {
        "bucket": "bucket_name",
        "path": "subdirectory_path",
        "aws_access_key_id": "your_aws_access_key_id",
        "aws_secret_access_key": "your_aws_secret_access_key"
      }
    }
  }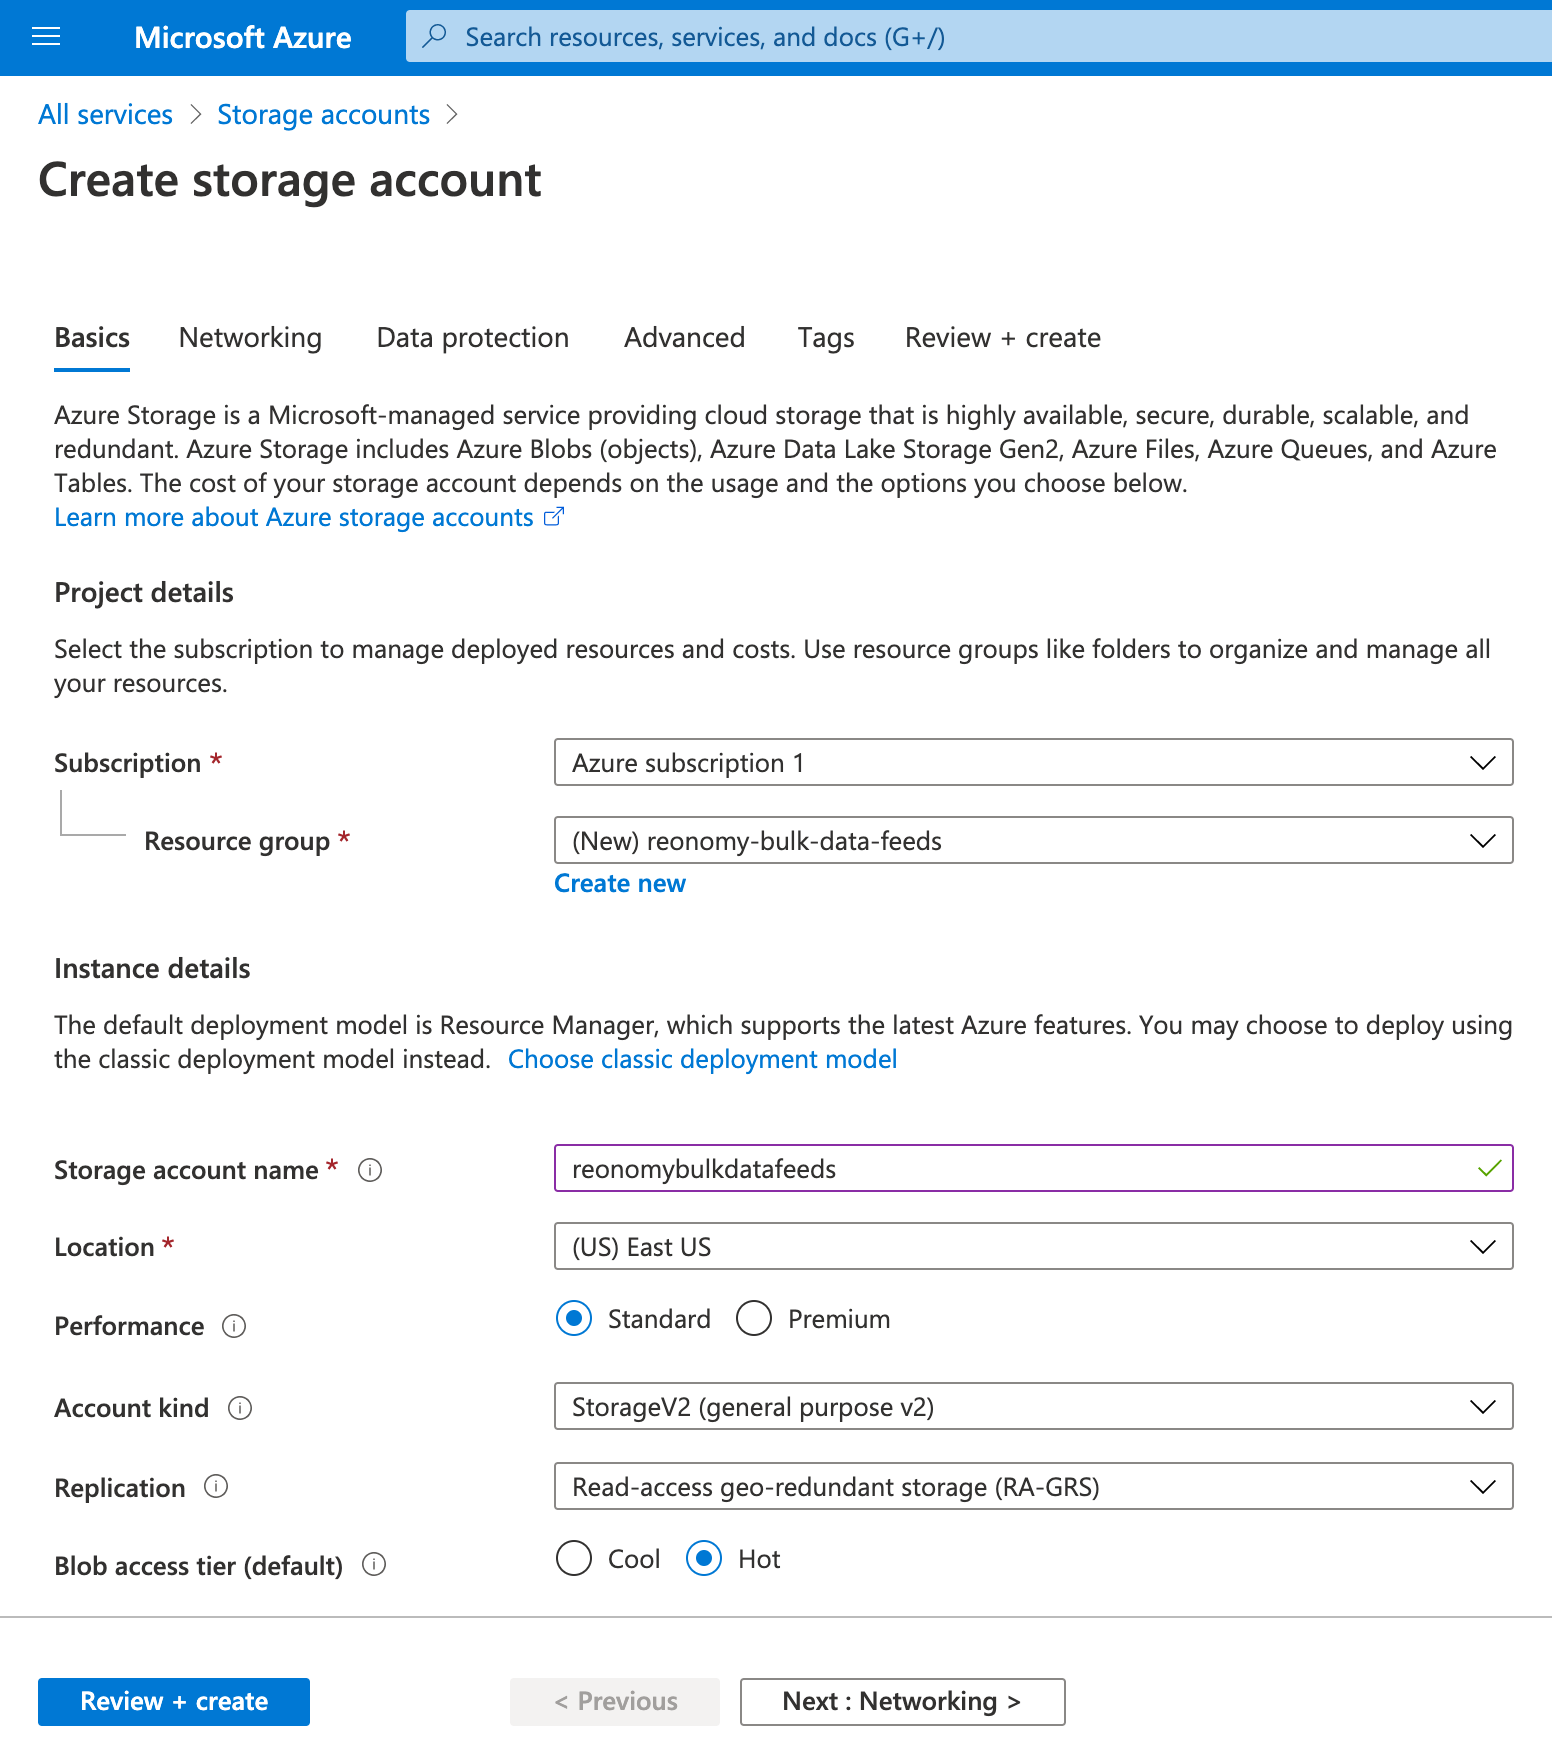
}Bulk data feeds can optionally deliver output files directly to a Microsoft Azure Storage container. To do this:
Using the container name and connection string from above, configure the external_storage section of the job spec's options section as shown on the right. The path is optional.
Note: When you open (or GET) a job spec that's configured for external storage on Azure, the connection_string field is not included in the version that's returned by the server. This is done to maintain the security of your credentials. If you need to modify an existing job spec, you'll need to include the connection string in the new version before saving it.
{
  "options": {
    "external_storage": {
      "azure": {
        "bucket": "container_name",
        "path": "subdirectory_path",
        "connection_string": "your_azure_connection_string"
      }
    }
  }
}